Exocad eggshell provisionals and model design

kimba

kimba

Active Member
Full Member
Messages
482
Reaction score
58
Hi gang,
I am using exocad to design some eggshell provisionals from a scan for the first time. All is well until I am at the model desgn stage. I would like to print a model with some dies prepped to my provisionals , exocad is reminding me to virtually extract the teeth before making reduced dies , but I cannot work out how to do that. All I can do so far is to design a model with my temps as part of the removable die , not removable preps.
Can anyone shed some light as to how I can do this
cheers
 
kimba

kimba

Active Member
Full Member
Messages
482
Reaction score
58
Thanks for your response mark , it made me at least feel better in that it wasnt just me.

Beldent , I found that on youtube as well , will have a further look today . it didnt look particularly straightforward or to be quite what I am doing but I will have a look again with fresh eyes. I am just super busy with the pre christmas madness I was hoping for a seamless exocad only process.
 
B

Beldent Inc.

Member
Full Member
Messages
60
Reaction score
0
Thanks for your response mark , it made me at least feel better in that it wasnt just me.

Beldent , I found that on youtube as well , will have a further look today . it didnt look particularly straightforward or to be quite what I am doing but I will have a look again with fresh eyes. I am just super busy with the pre christmas madness I was hoping for a seamless exocad only process.
no problem!! Looks more like a workaround thank a normal workflow haha. If not ask their support, I don't know how good they are but maybe they have a better way! :) good luck with this and Xmas madness :arghh:
 
E

erzdaemon

Member
Full Member
Messages
64
Reaction score
0
Hi Kimba,

not just you :D i was playing around with this some time ago.

I never understood why it wouldn't just make a die from the eggshell Design.
I think it had a problem between design and modelcreation.

However, DigiSculpt's Tip sounds reasonable and easy, picking up on this again

TY
 
E

erzdaemon

Member
Full Member
Messages
64
Reaction score
0
Ooof me again,

so i remember the Problem now.

When choosing option B in Step 8, you will get the model with the extracted tooth, on which you cannot work the Provisional, but you'll have the seperate die at least.

When you go for C, you get a cutout model with the extra die, which may work for you.

So if we want a complete model with seperate die, we gotta go option B or C first to get the provisional die.

And then we gotta do a separate model WITHOUT the tooth-extraction and use DigiSculpt's Tip to make it the full model minus the provisional crown.

But then still, we will be missing out the configured gap (also in step 8),for the provisional from the first Modeldesign i think.

But then again, for fitting the provisional on the Model, it would be better to actually have no gap.

My head aches :D this is way to complex for such a little task, hope i could help a little

Edit: TLDR: Try plateless model with cutout dies, do the tooth extraction and use option C in step 8, should work for you, gotta estimate approximal contacts though
 
Last edited:
kimba

kimba

Active Member
Full Member
Messages
482
Reaction score
58
Thanks erzdaemon,
when things settle down a bit I am going to follow up on this again
 
E

erzdaemon

Member
Full Member
Messages
64
Reaction score
0
If you got any Problems with the instructions > Provisional Crown Dies feel free to ask, it took me some time to understand that load.

I finally nailed it :D

As sayd before, if you wanna go model with cutout dies you should be fine already, but if we want a model including that provisional die and 1x provisional die extra i went as follows:

When done with the tooth extraction in expert mode, go back to wizard and click on the tooth until light Blue ( option C step 8 ).
Then you can check "dies" and "settings" tabs. We don't want hollow model or undercuts for the die. Basically remove all checkmarks you find here.

Then go back to the provisoinal tab and start the creation of the die. Then you see the created provisional die preparation margin may intersect the model, because the tooth extraction is yolo'd by the software ofc and the provisional margin will not be taken into account.

We now can go back to expert again and freeform the model. Make sure to visualize the die here, it may be disabled top left / viewing options.

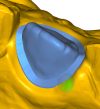
Now Freeform the model so we have the prepline of the die not inside the model( see attached picture). You can watch out for the approx-contacts here also.

Here you can now also right click on the die and save it in relation to this scene, we need that for attaching it to the model again, cause the die created by modelbuilder will be saved in a different orientation.

You can now go directly back to freeform model and add that saved die as attachment ( attachment, add, scroll down to bottom to add the file we just saved).

That should be it, you can go back to wizzard and finish the model process. We now have the provisional die attached to the model and a seprate provisional die.

Cheers
 

Attachments

  • die_margin.png
    die_margin.png
    274.6 KB · Views: 7
Last edited:
Top Bottom