Warping/Fracturing 8-unit Framework...4 remakes, driving me crazy

M

Mercury456

Member
Messages
2
Reaction score
0
Hello DLN, first time posting! We have been having trouble with an 8 unit bridge.

The first time we tried sintering it on beads,without a support bar, and the bridge was rocking on the model. This was done with our standard sintering program, heating 10 degrees(Celsius)/min up to 1550. Hold at 1550 for 2 hours. Cooling is 5 degrees/min to 0.

The second time we tried with a Sum3D kickstand sintering bar, we stood it up in the oven on beads. However this was done in an older Zyrocomat we use for single units, 7-8 hour cycle, don't know the ramp or cool numbers. The bridge fractured around the sprues when despruing.

The third time we tried with the same Sum3D bar but with a much slower sintering program (again standing on beads). Our sintering program was: heating 5 degrees(Celsius)/min up to 1550. Hold at 1550 for 2 hours. Cooling is 2 degrees/min to 0. Still fractured around the preps and sprues in two places.

The fourth time...Done without a sintering bar again with standard sintering program, it rocked on the model.

We use Talladium High Strength Luminesse Zirconia. Roland DWX-50 mill (bridge was done with a "high quality" strategy, don't know specifics). This bridge was designed on Exocad. We use Sum3D for CAM. Using a Zircomat 6000 MS. Vita YZ 380 sintering beads. We dip the Zirconia in ZirkonZahn water-based color liquid for 45 seconds and dry under a heat lamp for 1 hour.

I am a newbie in the dental lab field and CAD/CAM, the lab has had success with these types of bridges using a 7-8 hour cycle in the past, using a process very similar to what I described, so thoughts about common newbie mistakes/execution would be great!

picture of CAM setup.
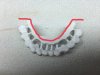
8


bridge #3 on model
8


bridge #4 on model
8
 
j.abadsantos

j.abadsantos

Member
Full Member
Messages
24
Reaction score
3
Try to brush not dip.
dcf357330d9579104fdeac6c6b33c48f.jpg


Sent from my iPhone using Tapatalk
 
j.abadsantos

j.abadsantos

Member
Full Member
Messages
24
Reaction score
3
Here is my oven parameters.
e20b664e0bc61fc6127220bf1a7e37e2.jpg


Sent from my iPhone using Tapatalk
 
j.abadsantos

j.abadsantos

Member
Full Member
Messages
24
Reaction score
3
Here is a big zr bridge
5c496febfa51c44bec898b7a3c3764b5.jpg

d984e7cf0f70a720deef34610331e9b1.jpg


Sent from my iPhone using Tapatalk
 
P

PJR

New Member
Full Member
Messages
25
Reaction score
5
Send it to a milling center and be done with it.
 
KTR

KTR

Active Member
Full Member
Messages
115
Reaction score
22
I would dry 3 hours at 250 centigrade in a porcelain furnace.
 
cadfan

cadfan

Well-Known Member
Full Member
Messages
1,524
Reaction score
207
Every zircon is different but a few things are the same as bigger as longer and slower !!!!! dry minimum 1 hour 80-100 degrees celsius not more slow heat up to max 100 degreess celsius not sure in yours. Every zircon has a transition temp 900-1000 degrees heat up 4-10 degrees at transition temp make a stop 30 min the hole object must have this temp and zircon is a bad heat conductor . At transition temp the zircon is like gum and begins to shrink and move thats why support ( pins, bars, pearls) are necessary . At transition temperature the whole case crown and membered bridge ,center and at the edge and the ofen is big !! and heating elements tend to overfire and there is only one temp sensor must have the same temperature because of thermal distortion . After these 30 min thermal equilibration stop the temp goes up to end temp with 2-10 degrees ( big with bar 2 degrees) per minute. Bigger cases need sometimes more than 2 hours up to 3 or 4 hours hold temp . sintering is like permanent cooling with water as bigger as more !!! like firring big ceramic bridges they need more energy too !!!! either longer hold or higher temp or both. Than go down to transition temp with same temp as up and a short hold 10 min than down to 200 degrees with up temp. As i stated at the start same same but different zircon,ofen, coloring liquid . For example DD liquid is with glucose if you dry over 120 degrees the glucose seals the surface and sometimes you get cracks with another liquid it works.but as we learned at school water boils at 100 degrees and evaporates below and at 140 in the vapor pressure pot theirs a lot of power that helps for fast cooking but in some zircon cases although for fast cracking.
 
G

GeneNY

Active Member
Full Member
Messages
174
Reaction score
19
Use a sintering bar like this 1 and stand it up straight (no beads) case done image.jpg
 
G

GeneNY

Active Member
Full Member
Messages
174
Reaction score
19
IMHO if u r using water based liquids there is really no need for such long dry times. 10 min works perfect under a lamp.
Acid based liquids need to be dried out thorally , not water based
 
Marcusthegladiator CDT

Marcusthegladiator CDT

Well-Known Member
Full Member
Messages
3,094
Reaction score
432
Well before you start remilling Zirc, try milling the frame in PMMA and check the fit. If the PMMA frame rocks like the rest, it was doomed from the scan. If the PMMA fits, then you can move on to remilling and resintering.
 
rkm rdt

rkm rdt

Well-Known Member
Full Member
Messages
21,447
Reaction score
3,288
Well before you start remilling Zirc, try milling the frame in PMMA and check the fit. If the PMMA frame rocks like the rest, it was doomed from the scan. If the PMMA fits, then you can move on to remilling and resintering.

That makes sense on many levels.
 
Patrick Coon

Patrick Coon

Well-Known Member
Full Member
Messages
1,174
Reaction score
565
When using brush on coloring liquids we always recommend at least 2 hours dry time @ 80C or 150F for bridges. If dipping for 45 seconds I would imagine you would need a longer dry time up to about 4 hours.
 
R

Ryan

Active Member
Full Member
Messages
101
Reaction score
14
The warping issue could be caused in 2 places in my opinion.... 1) Make sure that all your dies were fully seated at the scanning stage, if one is slightly lifted this will cause an inaccurate fit. 2) I always try to keep the support bar the same thickness all the way around the bridge. The pictures you are showing looks a little thick on the anterior.

The fracturing is problem from the sintering cycle: The Mihm Vogt sintering oven is very nice, however default setting in the "function" menu that allows you to control what temp the table drops. For me 300 is way too high for large cases, and most of the time you wont see the fracture until porcelain application or worse case in the mouth. I have set mine to 150 C and have not had a fracture since.....

I hope these help....
 
R

Ryan

Active Member
Full Member
Messages
101
Reaction score
14
You might also want to try and give a little more support at the base of the bar....Sorry my paint skills are lacking but you should get the idea...
 

Attachments

  • Support.jpg
    Support.jpg
    181.6 KB · Views: 71
G

grantoz

Well-Known Member
Full Member
Messages
2,001
Reaction score
366
you must have a flat bar that the bridge sits up right on or it will warp along with the bridge .I would try sintering the bridge in a furnace that doesn't use beads I have the vita furnace and a very old zirkonzahn furnace I always fire large bridges in the old non bead furnace because it gives you a stable support for the bridge.if we have a bridge that doesn't fit its us not the material the talladium zirk is a very good material ,also.you are over firing It you need to go no higher than 1480c and you are firing it to quickly an over night program is the way to go maybe something around the 10 hour mark and that would be only up to 1450c.also dipping isn't necessary just paint it then drying isn't as big a head ache.
 
Top Bottom