
chhe vuthy
Member
- Messages
- 3
- Reaction score
- 0
i want to know how to do it
thanks
thanks


thanks for your answerstep 1, create a full arch of "preps" as individual waxups. scan them in with your scanitLibrary software.
step 2, allow that library to be used as attachments for bars
step 3, scan and design a bar.
step 4, add your preps as attachments on top of the bar.
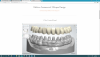
thanks for your answerSomething like so? If yes then it really takes some time to create prep attachments. I have two style, natural teeth preps as in the images or abutment style preps.
Optional step 1: If you don't have a wax up to follow quickly create one using temp on prepped model and use upper/lower scans of actual case to quickly make a wax up to follow and place preps under.
Step 1: Create an or for all on X and select the abutment sites as FC screwretained units and add gingival and bridge or make as a bar and morph the bar out to support the gingival. Also add pre-op to follow as a guide for placement of prep attachments.
Step2: Set SRC's as low as possible acting like a coping over the Ti bases, and bridge together, doesnt eve have to mean connector thickness, just clear the tissue that's all. Then create your gingival design and then place the prep attachments on top of the gingival and morph the tissue before you finalize all the attachment to the gingival. Then to final sculpting and at the very end uncheck use screw holes. Reason for this is so you can copy and append prepp to scan model. Other wise you will get a invalid boundary error. Once you have a successful copy and append you will need to simply redesign the file and simply run through the steps not making any modifications and check use screw hole so you have the frame with holes for milling.
Step3: Create another new order for only the crowns, and then import the files from the copy and append case into the new order and bring in the wax up either digital designed one or the actual wax up. Design crowns and mill. After t6his it is all up to to figure out the bonding and and final gingival design to seal the margins.
I know what everyone will be asking and no i will not just hand these dme's out. Sorry, gotta make your own. Design a custom abutment then gran the dme out from the cad folder in the case file and close all holes and make it into an attachment, you need to figure the rest out.
View attachment 30838 View attachment 30839 View attachment 30840 View attachment 30842 View attachment 30843 View attachment 30844 View attachment 30845 View attachment 30846 View attachment 30847 View attachment 30849