finnster68
Yep im an Aussie
Full Member
- Messages
- 137
- Reaction score
- 3
Hi All
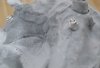
Just after some help with a locator case.
This is the first implant case i have done so go easy on me")
The issue i am having is after luting the Locators to the frame in the mouth, the locator on the left side (25) just wont engage when i try it back in.
Ive used the white blockout spacer things, seated the locator over abutment ensuring it clicks into place, Mixed up Duralay and seated the frame in the mouth. I luted the 14 first.
After doing the 14, i confirmed the frame clicked into place nicely which it did.
I then did the exact same thing for the 25 and have now tried it 3 times with the same result each time.
After letting the Duralay set it seems the retention is fantastic as its quite difficult to get the frame out.
But once i place it back in just to verify the fit, it always the same. Left side no longers clicks into place. It just sort of drops out.
I am wondering whether it has to do with the height of the implant. I believe they realy should be at gum level which the 14 is, the 25 is around 3mm above on the buccal side.
I tried extra white blockouts over the 25 but still same result
I know my initial Impression isnt great but once i get the frame luted nicely to the locators the plan is to do a nice pickup impression.
Would it make any difference if i was to remove both locators and do the 25 first? then the 14.
I guess whats confusing me, is i would have thought that luting the locators in the mouth in theory they should just click on anf off nicely.
It clicks perfectly both sides on the model. Just not in mouth even though i luted them in the mouth
I have ordered in some of the extended range just incase the 25 is angled too much.
Should i just process and finish the denture then place an extended range one in that side? or if it does not click into place now with the black processing ones in the mouth with just the frame, will it still be the same on insert ??
Anyway any ideas would be greatly appreciated

Tony
Just after some help with a locator case.
This is the first implant case i have done so go easy on me
The issue i am having is after luting the Locators to the frame in the mouth, the locator on the left side (25) just wont engage when i try it back in.
Ive used the white blockout spacer things, seated the locator over abutment ensuring it clicks into place, Mixed up Duralay and seated the frame in the mouth. I luted the 14 first.
After doing the 14, i confirmed the frame clicked into place nicely which it did.
I then did the exact same thing for the 25 and have now tried it 3 times with the same result each time.
After letting the Duralay set it seems the retention is fantastic as its quite difficult to get the frame out.
But once i place it back in just to verify the fit, it always the same. Left side no longers clicks into place. It just sort of drops out.
I am wondering whether it has to do with the height of the implant. I believe they realy should be at gum level which the 14 is, the 25 is around 3mm above on the buccal side.
I tried extra white blockouts over the 25 but still same result
I know my initial Impression isnt great but once i get the frame luted nicely to the locators the plan is to do a nice pickup impression.
Would it make any difference if i was to remove both locators and do the 25 first? then the 14.
I guess whats confusing me, is i would have thought that luting the locators in the mouth in theory they should just click on anf off nicely.
It clicks perfectly both sides on the model. Just not in mouth even though i luted them in the mouth
I have ordered in some of the extended range just incase the 25 is angled too much.
Should i just process and finish the denture then place an extended range one in that side? or if it does not click into place now with the black processing ones in the mouth with just the frame, will it still be the same on insert ??
Anyway any ideas would be greatly appreciated
Tony