Millbox. Is it possible to display a screenshot (jpg) as a semi-transparent image?

D

Dentaco

Member
Full Member
Messages
10
Reaction score
0
Can you display an external image (.jpg) semi-transparently over the milling blank with the Millbox software?
The background to my question is the following.
I want to switch to Millbox from another CAM because I want to buy a new milling machine.
I have more than 80 zircon milling blanks in use.
My previous CAM always creates a current screenshot after placing crowns. If I can show this screenshot of the milling blank, I could continue to use all the milling blanks in Millbox. otherwise I probably wouldn't switch to Millbox.
 
CoolHandLuke

CoolHandLuke

Idiot
Full Member
Messages
10,096
Solutions
1
Reaction score
1,411
if you can see the fixture on screen, and you know your alignment landmark, why do you need a screenshot?
 
T

tuyere

Active Member
Full Member
Messages
391
Solutions
2
Reaction score
0
if you can see the fixture on screen, and you know your alignment landmark, why do you need a screenshot?
I've had this problem with blanks I used for calibration jobs, where I run a preconfigured job file so nothing actually gets nested and the library blank doesn't reflect reality, and it limits how tightly you can pack stuff because you have to leave a generous margin of error.
My extremely janky workaround is to take a photograph of the blank on a black background, print it at monitor-fixture-sized scale in b/w for contrast, and... just hold that sucker up once or twice over the illuminated screen as you nest, just to see how close you're cutting it. Incredibly annoying, but it works well enough.
 
greeny

greeny

Active Member
Sponsors
Full Member
Messages
230
Reaction score
95
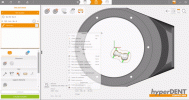
Which machine(s) are you shopping for? There's a good chance that hyperDENT can also be paired with your new equipment. If so, there's a feature where you can import and reorient an image/screenshot of your partially used pucks. Although it's not the most high-tech or robust solution, it makes it easier to "play battleship" with pucks that weren't originally created in hyperDENT.

hyperDENT_background_image_blanks.gif
 
zero_zero

zero_zero

Well-Known Member
Full Member
Messages
6,303
Reaction score
1,397
I just shrunk the disc on the screen to the size of the actual disc, and held the disc up to the monitor, then manually added the curves where the used parts were Dontknow
I did that many times Banghead
 
Affinity

Affinity

Well-Known Member
Donator
Full Member
Messages
6,948
Reaction score
1,062
Now show us how you made and uploaded that video greeny!
 
B

Beldent Inc.

Member
Full Member
Messages
60
Reaction score
0
I've had this problem with blanks I used for calibration jobs, where I run a preconfigured job file so nothing actually gets nested and the library blank doesn't reflect reality, and it limits how tightly you can pack stuff because you have to leave a generous margin of error.
My extremely janky workaround is to take a photograph of the blank on a black background, print it at monitor-fixture-sized scale in b/w for contrast, and... just hold that sucker up once or twice over the illuminated screen as you nest, just to see how close you're cutting it. Incredibly annoying, but it works well enough.
I just put the real blank in front of the screen and unzoom the blank in the software and try to see if my new case is ok hahaha, gotta find wayssss
 
CoolHandLuke

CoolHandLuke

Idiot
Full Member
Messages
10,096
Solutions
1
Reaction score
1,411
i use the alignment point of the disc and a ruler.
 
Affinity

Affinity

Well-Known Member
Donator
Full Member
Messages
6,948
Reaction score
1,062
greenys method is the bomb.. too bad I dont use my HD for zirconia
 
D

Dentaco

Member
Full Member
Messages
10
Reaction score
0
I want to buy a Roland DWX53DC or DWX52DCi
 
MikeW

MikeW

Member
Full Member
Messages
62
Reaction score
12
Yes, that's what I mean and I also know from DS-CAM (Dental-Softworks).
Does anyone know if this also works with Millbox?


Hi Guys - You can import discs from pictures in MillBox (You've been able to do this going back to SUM3D). If you have the preview images from your other CAM and the surfaces are contrasting well enough, you can import them in MillBox with minimal processing / steps. You can also just take top-down photos of your discs and clean them up a tad prior to importing. Here's a video we made for you guys:

 
Last edited:
D

DaveId

Member
Full Member
Messages
68
Solutions
1
Reaction score
0
Hi Guys - You can import discs from pictures in MillBox (You've been able to do this going back to SUM3D). If you have the preview images from your other CAM and the surfaces are contrasting well enough, you can import them in MillBox with minimal processing / steps. You can also just take top-down photos of your discs and clean them up a tad prior to importing. Here's a video we made for you guys:


I'll try this later, the high contrast is something I didn't even think about.
 
M

MrNeverFixit

Active Member
Full Member
Messages
177
Reaction score
0
Hi Guys - You can import discs from pictures in MillBox (You've been able to do this going back to SUM3D). If you have the preview images from your other CAM and the surfaces are contrasting well enough, you can import them in MillBox with minimal processing / steps. You can also just take top-down photos of your discs and clean them up a tad prior to importing. Here's a video we made for you guys:


I have done this not the best. Somestimes it will not recognize the mill pockets.

Place the disc on your monitor and and zoomout to the size of the disc. import the crown. And place it. This is what i usually do now.
 
T

tuyere

Active Member
Full Member
Messages
391
Solutions
2
Reaction score
0
Hi Guys - You can import discs from pictures in MillBox (You've been able to do this going back to SUM3D). If you have the preview images from your other CAM and the surfaces are contrasting well enough, you can import them in MillBox with minimal processing / steps. You can also just take top-down photos of your discs and clean them up a tad prior to importing. Here's a video we made for you guys:


I tried this out and didn't get good results- I took a clear, high-contrast picture of a used wax disc from Roland manual calibration, which is just four square holes centered within the disc, and it badly offsets the projection, like 20mm to the left of where it should be. Made sure the picture was dead-perpendicular to the disc, took it on a black background, etc.
I have like 10 wax discs with the same cutouts in the sample spots, so I only need to do this accurately once and can then duplicate it as needed, I might just model a block with the same dimensions as the calibration blocks w/ the right clearances, and put four of them in the right place and "send the job" to create the right used disc profile.
 
Top Bottom