prestige.dental
Active Member
Full Member
- Messages
- 270
- Reaction score
- 15


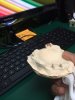
The abutments were placed in the mouth and regular crown bridge impression taken without paying attention to margins as we would get the margins from D900 scanner by individual abutments scanning as a die. But the stone abutments broke as we removed the cast from PVS impression....poured the cast 3 times and abutments broke every time all though the abutments are perfectly parallel.
I gave up.
The cast u are seeing with the abutments on is closed tray impression with right hex orientation but close trays are never accurate and the open tray impressions although accurate do not carry hex position.
The PVS impression of the abutments in the mouth is accurate but it I can't remove the damn cast out of the impression intact
.