3D printing soft tissue

H

HowLite Dental Lab

New Member
Full Member
Messages
8
Reaction score
0
Hi everyone,

Has anyone tried printing soft tissue with Next Dent's ginigiva mask resin? I am looking for a soft tissue resin that doesn't have the splitting problem.

Please let me know if you have any experience with a suitable resin.

Thank you
 
S

sirmorty

Active Member
Full Member
Messages
616
Reaction score
37
I use the Next Dent Gingival mask on the Ackuretta Sol.

Haven't had any issues with splitting unless the what I'm trying to print is really thin.
 
H

HowLite Dental Lab

New Member
Full Member
Messages
8
Reaction score
0
What's the thinnest you've gone to with no problems do you reckon?

Really appreciate the help
 
S

sirmorty

Active Member
Full Member
Messages
616
Reaction score
37
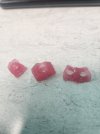
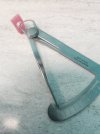
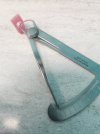
I just measured the thickness of some soft tissues sitting around.
Looks to be .4mm. You can see how thin it is.
20230117_131129.jpg
20230117_131249.jpg
 

Attachments

  • 20230117_131249.jpg
    20230117_131249.jpg
    145.3 KB · Views: 31
H

HowLite Dental Lab

New Member
Full Member
Messages
8
Reaction score
0
Thank you very much Morty, really appreciate the advice
 
E

erzdaemon

Member
Full Member
Messages
63
Reaction score
0
Soft tissue may also get brittle / splitting if overcured or left too long in ipa/isopropanol.

We try do max 1500 Flashes in Otoflash G171 and use ultrasonic cleaner for max 10 min in Isopropanol ( Optiprint Gingiva 385)
 
tehnik

tehnik

Active Member
Full Member
Messages
520
Reaction score
12
I print Asiga dentagum and I don't post cure it as it gets too hard.
 
rkm rdt

rkm rdt

Well-Known Member
Full Member
Messages
21,443
Reaction score
3,288
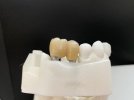
I only print the soft tissue for large span anterior bridges. Otherwise I design the tissue area but omit the print and leave the space.
 
T

tuyere

Active Member
Full Member
Messages
390
Solutions
1
Reaction score
0
Most of the splitting I see is the result of physical damage after printing, splitting with time from passive UV degradation isn't an issue because working models just don't hang around for that long. We use Keystone Mask on Asiga Maxes, post-cure with Dreve PCU LEDs under vacuum, btw- Otaflash curing for these seems less consistent, even with the shielding gas.
  1. Limiting how 'tall' your unsupported thin sections are,
  2. keeping your wash times as short as possible,
  3. handling them gently at all times, and most importantly,
  4. Printing everything in duplicate (or triplicate if it's a really tricky bit of gingiva)
Is my working theory here.
What this typically means is carefully hand-washing parts with soft natural bristle brushes in a small tray of IPA and then drying immediately with warm air vs. chucking them into an impeller wash unit that'll tumble them around for several minutes. Handling them with tongs can also help if you're clumsy in gloves like I am. I've also tried connecting large numbers of gingiva together in sprue-linked 'rafts' that you can create in Prusa Slicer, so they stay put in the wash and you can handle them as a single unit without damaging them, then separating them after post-curing for assembly, but it isn't really worth the extra work most of the time.
I also started working on a 'supportive mandrel' for gingiva with particularly delicate sections, basically a printed plug with the same geometry as the gingiva's hollow sections that you insert to support them internally and also serve as a little handle for moving them about, but it wasn't worth the effort of removing them all so the UV post-cure can reach the interior cavities.

That said, I stopped bothering with all the gimmicky measures when I realized it's cheaper and faster to just run one or two back-up parts, at least one of them will usually come out gnarly but you almost always get an acceptable one.
 

Similar threads

H
Replies
0
Views
435
HowLite Dental Lab
H
PRO ARTS DL
Replies
3
Views
389
LuthorCorp
LuthorCorp
D
Replies
18
Views
1K
Andrew Priddy
Andrew Priddy
T
Replies
11
Views
493
tuyere
T
Top Bottom