Brett Hansen CDT
Well-Known Member
Full Member
- Messages
- 1,683
- Reaction score
- 102


Yes I have a multi-orrifice tip. I only recently even learned that flux was a thing. I can feel you all wincing but honestly I kinda got thrown into the deep end and I'm trying to figure things out on the fly. The arm is balanced from what I can tell, it's quiet and smooth.Lots of good stuff mentioned so far. I’ve use Natural gas/ oxygen for casting here. No problems.
What torch tip do you have. Use a multi-orrifice tip.
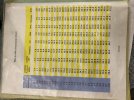
Oxygen pressure for gold crowns, I set at 5lbs. (For ceramic alloys,20lbs.)
Open up torch, heat crucible, start to melt gold,(usually remelt button first, then put in new ingots) and when it starts to pool, dial back the oxy valve on the torch to give it a more brush flame. Quick shake of flux, load ring , gold should look like a shiny pool, let it fly.
Have you balanced the weight on the broken arm yet?
Two winds for gold crowns works here. Three for ceramic alloys.
View attachment 39392
View attachment 39393
Does it matter which way they face in relation to each other? I have the minimum space needed between them I believe.
I didn't have time to check with you all before investing (yay rush cases on a Friday lol).
I have some safety concerns about my torch which I'll try and post later. I have a janky setup that I inherited when I took over this department. There's no regulator for the gas just a direct line to the torch which I'm controlling only with the adjustment knob there.


The regulator is only on the oxygen tank. Gas is direct line . You adjust the valves on your torch.
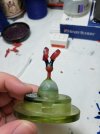
Might be tough to see, first pic is 5lbs oxygen on with valve open up on torch. Small cones on outer of flame. After melt happens i turn torch knob down to get more of brush flame (so you don’t over burn the gold).
you didn’t say if you do fast burnout? Putting ring in hot oven? I like to do that at 1450F. After 30 minutes to burn out residue, turn down to 1250 F. After 30 minutes, time to cast!
View attachment 39396 View attachment 39397
Thanks this helps a lot. I am doing fast burnout as per recommendation of investment company. I was using Starvest for everything but having problems with it cracking. Now I'm using a LiSi Press investment that's designed for emax press, but the guy there said it works great for gold too so I use it for emax press and gold. It goes in at 1500F for like 40 minutes and then I've been lowering it to 1000F to cast it.

Yes I have a multi-orrifice tip. I only recently even learned that flux was a thing. I can feel you all wincing but honestly I kinda got thrown into the deep end and I'm trying to figure things out on the fly. The arm is balanced from what I can tell, it's quiet and smooth.
As for weighing the patterns to estimate the alloy needed, if you look at the pictures I'm using PMMA milled crowns that I cut the margins off and wax them back (since usually the mill isn't quite as nice as the margins need to be, but the occlusion anatomy is good). I imagine the PMMA weighs different than the wax so I'm guessing I might have to adjust any chart I find slightly. So far I've just been guessing (and using more alloy than needed).
")
PMMA, I really didn't think of that one before. If I were to use PMMA, I'd probably design the margin just above the margin to have it be milled a bit shorter.
My concern with PMMA is that it lowers your tool life compared to wax. It may also have a different expansion rate compared to wax and take a bit more time to burn out. I personally would rather use wax, it will be more forgiving on a die, especially if there's an undercut. Get some margin wax to seal your margins, and call Ron @rc75 TD Dental Supply and see if he will send you a free disc of the beige, or grey wax. I tend to like the beige wax, but used the grey for a long time.
ps2, I was typing this as you posted
View attachment 39393
Does it matter which way they face in relation to each other? I have the minimum space needed between them I believe.
I didn't have time to check with you all before investing (yay rush cases on a Friday lol).
I have some safety concerns about my torch which I'll try and post later. I have a janky setup that I inherited when I took over this department. There's no regulator for the gas just a direct line to the torch which I'm controlling only with the adjustment knob there.
I will check into that, I do have some wax pucks and tried that but I found that when checking the fit on the die it would sometimes crack. Like even with a more generous spacer sometimes the preps we get are rough enough to cause issues. I'm not sure exactly. I did find that as-milled the margins weren't satisfactory, and when I cut them off it was harder to wax the margins back.
I tried designing them where I'd draw the margin higher than the actual margin but found that kinda messed with the contour of the proposal more than I liked. Sometimes the PMMA is a slam dunk perfect fit don't have to do anything to it. I apply a very thin coat of wax all around (skipping the occlusion) and that apparently facilitates burnout. I don't think the issues I've had are a result of not giving it adequate time to burnout but that's all interesting info you folks listed. I will have to try more with the wax pucks, and maybe I've have more luck with the pucks you all are talking about.
It wasn't terrible, like it was obvious when I was waxing the margin in that I needed to build up the contour a little more but it just seemed like more effort than it was worth. I also tried 3d printing the crowns in a wax/resin hybrid material but the margins weren't satisfactory there either. I have another thread going about 3d printing problems and of course the printer I have isn't accurate enough to do as advertisedI hadn't thought about what the proposal may give you if you designed higher. That could be frustrating.
It wasn't terrible, like it was obvious when I was waxing the margin in that I needed to build up the contour a little more but it just seemed like more effort than it was worth. I also tried 3d printing the crowns in a wax/resin hybrid material but the margins weren't satisfactory there either. I have another thread going about 3d printing problems and of course the printer I have isn't accurate enough to do as advertised
Since I'm newer to the dental lab world I don't really have the anatomy knowledge to efficiently wax a crown up from scratch yet. I've had to do it a few times but I'm painfully slow. I want to learn the whole dipping and hand waxing method but I just haven't had the time yet.
totally agree. I started my path in this field almost twenty years ago. My uncle handed me a PTC training manual on waxing copings, bridges, and FGCs. I still have a box of my first waxups. Learning tooth form is important, but you can do that without picking up a waxing instrument.With the technology of scanners, design software and mills, I wouldn't go back to hand waxing a FGC unless something broke down. I may be nice to know how to do it, but let some of the tooth libraries, anatomy libraries do that work for you. I do re-seal in margin wax a bit if needed, or add to cusp tips, ridges etc. that I want to tweak. The only time I hand wax is if I'm running short on time for a PFM single, then it is faster for me to hand wax it. Otherwise, the CAD/CAM wax comes out so nice and clean and consistent.
By the way, I'm impressed with how attentive to this thread you've been, and so willing to learn. You've really gotten some wonderful advice here, right from the start of page 1